No products in the cart.
Blog
How to Tune a Guitar without Electronics
31
Jul
Jul
As a longtime guitar player, I always pick up guitars when visiting friends and family, at garage sales or pawnshops, to find that the poor thing is entirely out of tune (let alone the rusty strings). By that I mean out of standard tuning, not a dropped D-tuning or Keith Richard’s beloved open G. Every player should know how to tune a guitar without the help of an electronic tuner, just in case it runs out of battery power at a moment you need it.
Tuning can be a nightmare, even more so when there are more instruments in play. Anyone who knows anything about the mathematical formula that describes an Octave, which stretches 12 frets, has on many occasions witnessed slightly irritating dissonants in between the open tones and the 12th fret. Truth be known, to tune a perfect pitch on a six string is just impossible, because of the sheer mathematics involved in neck, frets, bridge and quality of guitar strings. A string open and pressed in the twelfth fret should be exactly the same, but in between there are slight variations.
Before telling you how you can tune your guitar without an electronic tuner, you should know however that tuning onechord so that it sounds perfect, just causes all other chords to sound terrible. In tempered tuning all chords are slightly “out”, but all by a same small amount. The tempered scale is a compromise that enables us to play all chords and intervals, in all keys, with the same relative accuracy. It therefore follows that there is not one chord on the guitar that tunes absolutely pure. Therefore it is a total waste of time to tune the guitar to a chord and expect it to sound pleasing anywhere else. Over time and with experience, though, you can develop an ear for even tempered tuning.
Also the harmonics method does not work either, because harmonics are just that: approximations of a tone.
So here are your real options:
UNISON METHOD or 4th/5th fret method
The old faithful “4/5” method is perfectly correct in principle, since unison intervals are used. The method is as follows: one string, usually the high E, is tuned to a reference frequency provided by a keyboard or tuning fork or any other preferred method.
The 5th fret E on the B string is tuned to match the open E,
the 4th fret B on the G string is tuned to match the open B,
the 5th fret G on the D string is tuned to match the open G,
the 5th fret D on the A string is tuned to match the open D,
finally the 5th fret A on the low E string is tuned to match the open A.
If you have tuned accurately the interval between the two E strings will be exactly two octaves – the 5th fret double octave harmonic on the low E should sound at the same pitch as the open high E. The problem with this method is that if you get one string wrong, the following strings will also be out. But if you have a well-adjusted guitar and a good ear, it can work well.
Another method is OCTAVE METHOD
Any tuning method using octaves is correct in principle. There are many variations – one way is to tune the open B string one octave below the 7th fret B on the high E string, the open G string one octave below the 8th fret G on the B string, the open D string one octave below the 7th fret D on the G string, the open A string one octave below the 7th fret A on the D string, and – you guessed it – the open low E one octave below the 7th fret E on the A string.
But we’re back to small errors affecting the following strings again. To avoid this, and because tuning errors become more obvious further up the fingerboard, make your comparisons using only fretted octaves between the 7th and 12th frets, and try tuning in this order:
1. Tune low E two octaves below high E.
2. Compare high E and D – tune D.
3. Compare high E and G – tune G.
4. Compare D and B – tune B.
5. Compare G and A – tune A.
Last but not least there is my MY FAVORITE METHOD
If you tune all the strings to the same reference string, you can avoid a small error on one string affecting all the others.
Tune the high E string to a reference instrument or tone key: compare
5th fret E on the B string
9th fret E on the G string
14th fret E on the D string
7th fret E on the A string (one octave below)
5th fret harmonic on the low E string.
Then cross check if you feel it’s needed as follows:
12th fret harmonic on low E / fretted 7th fret E on A string.
12th fret harmonic on A / fretted 7th fret A on D string.
12th fret harmonic on D / fretted 7th fret D on the G string.
12th fret harmonic on G / fretted 8th fret G on B string.
12th fret harmonic on B / fretted 7th fret B on high E.
This method is also extremely effective at getting the best available results out of a poorly adjusted instrument.
TUNING TIPS
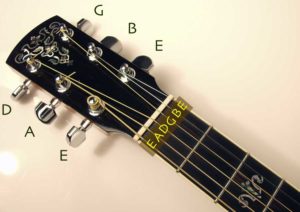
1. Learn to attach the strings to the machine heads properly!
2. Never try to tune down to a note – first tune below the target pitch, then stretch the string, then tune up to the note. (To avoid problems caused by the “play” in 99% of tuning machines.) Make a couple of deep bends (you don’t have to actually play the note, just bend it to settle the tension) then fine tune.
3. Before tuning a string that you suspect is out, check it against both adjacent strings!
4. When tuning a guitar with a vibrato arm, tune the string, give the arm a good shake, stretch the string, give the arm another shake, and fine tune. On the plain strings, bend the string a whole tone a couple of times (somewhere around the middle) before fine-tuning.
And if this all is too much, you can always drop by our store and pick up another one of the many electronic tuners in stock.